
How to Use the Lasagna Gardening Method for Healthier, No-Dig Beds
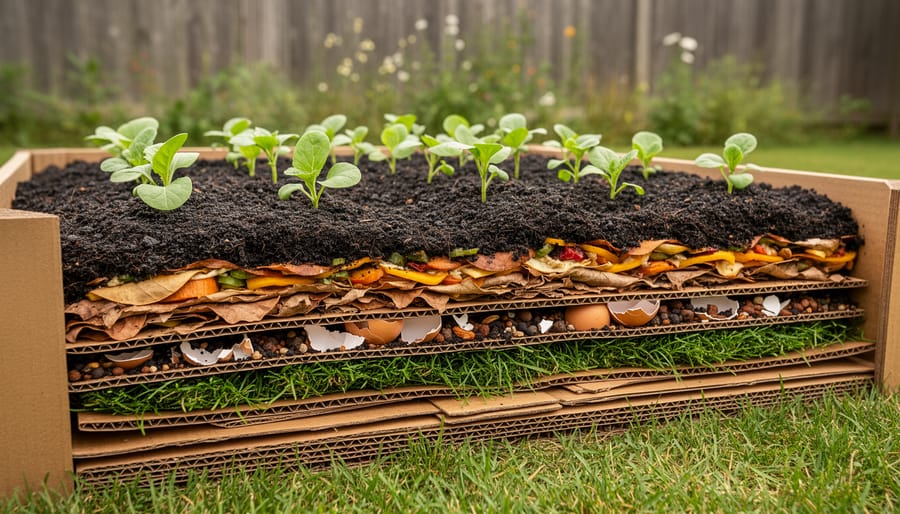
Lasagna gardening transforms yard waste and everyday organic materials into a thriving, no-dig garden bed using the same layering principle you’d use to make the pasta dish. You stack alternating layers of carbon-rich “brown” materials like cardboard and leaves with nitrogen-rich “green” materials such as grass clippings and kitchen scraps directly on top of grass or weeds. Over time, typically three to six months, these layers decompose into nutrient-dense soil that requires no tilling, minimal weeding, and far less water than traditional garden beds.
The method works because the layered materials create an ideal environment for beneficial microorganisms and earthworms, which break down organic matter while improving soil structure. The bottom cardboard or newspaper layer smothers existing vegetation without chemicals, while the decomposing layers above generate heat that accelerates the breakdown process and creates perfect growing conditions.
This technique has gained momentum among urban gardeners and sustainability-focused growers because it solves multiple problems at once. You’ll reduce waste headed to landfills, improve soil health naturally, and create productive growing space in areas where traditional tilling would be backbreaking or impossible. Whether you’re dealing with heavy clay, rocky terrain, or simply want to avoid the physical strain of double-digging, lasagna gardening offers a practical path forward.
Sarah Chen, a community gardener in Portland, started her first lasagna bed in fall 2025 over a weedy patch behind her apartment. “I was skeptical about just piling stuff on top of grass,” she admits, “but by spring, I had the most beautiful, crumbly soil I’ve ever worked with.”
Why Lasagna Gardening Works: The Science Behind the Layers
Lasagna gardening transforms organic waste into fertile soil through a natural process called aerobic decomposition. As microorganisms break down the alternating brown and green layers, they generate heat and convert raw materials into nutrient-dense humus. The carbon-rich browns provide energy for microbes, while the nitrogen-rich greens supply protein for their growth and reproduction. This microbial feast creates a self-sustaining ecosystem right beneath your plants.
The layered structure does more than feed decomposers. It creates air pockets that allow oxygen to penetrate deep into the bed, essential for beneficial bacteria and fungi to thrive. These organisms form networks that improve soil structure, making it crumbly and well-draining yet moisture-retentive. Earthworms migrate into established beds, aerating the soil further and leaving behind nutrient-rich castings. Unlike tilling, which disrupts these underground communities and damages fungal networks, the no-dig approach preserves the soil food web intact.
This method delivers multiple benefits that compound over time:
- Builds 6-12 inches of rich topsoil within months without purchasing amendments
- Diverts yard waste and kitchen scraps from landfills while eliminating disposal costs
- Suppresses weeds by blocking light with thick cardboard and organic layers
- Reduces watering needs by 30-50% as decomposing materials act like a sponge
- Requires no digging, making it accessible for gardeners with physical limitations
The environmental advantages extend beyond your garden. Each lasagna bed sequesters carbon in the soil rather than releasing it through decomposition in landfills. The method conserves water through improved soil structure and surface mulching, critical in drought-prone regions. You’re essentially recycling nutrients on-site, closing the loop between waste and growth while building soil that gets better each season rather than depleting it.
What You’ll Need: Materials and Tools for Your Lasagna Bed
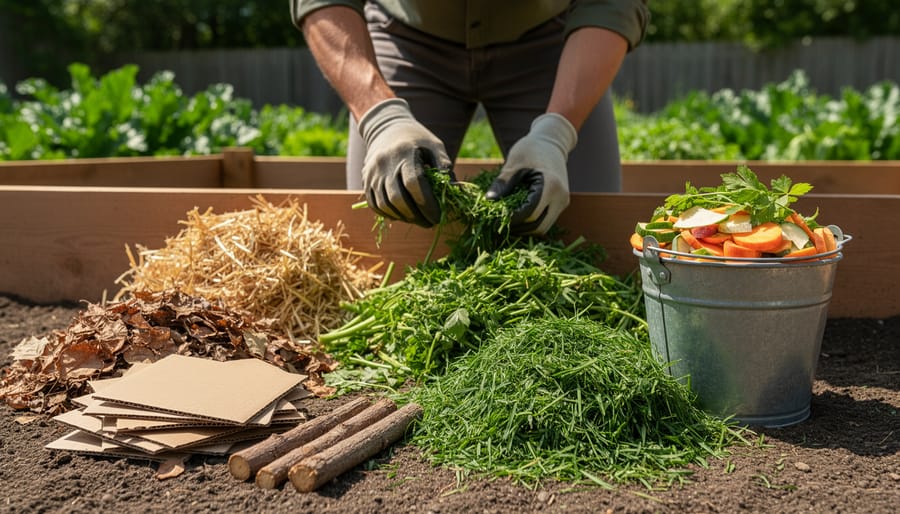
Brown (Carbon) Layers
Carbon-rich brown materials form the foundation of your lasagna bed’s structure. They break down slowly, create air pockets for drainage, and prevent nitrogen from washing away too quickly.
Shredded newspaper and cardboard work perfectly as base layers. Use non-glossy paper free from colored inks. Cardboard boxes (remove tape and labels) suppress weeds brilliantly while decomposing within 4-6 months.
Dried leaves add volume and nutrients as they break down. Shred them first, whole leaves mat together and block water. Oak and maple leaves work best; avoid black walnut.
Straw (not hay, which contains seeds) creates excellent airflow between layers. One bale typically covers a 4×8 bed with a 3-inch layer.
Wood chips decompose slowest but add lasting structure. Use aged chips rather than fresh; avoid treated lumber or cedar, which can inhibit plant growth.
Green (Nitrogen) Layers
Nitrogen-rich green layers provide the fuel that heats your lasagna bed and feeds soil microbes. Fresh grass clippings (from untreated lawns) break down quickly and add substantial nitrogen, though you’ll want to spread them thinly, thick clumps turn slimy and smelly. Kitchen scraps like vegetable peels, eggshells, and fruit waste work beautifully but should be buried within the layers to avoid attracting pests. Coffee grounds and filters contribute nitrogen while improving drainage.
Fresh plant trimmings from weeding or pruning add immediate nutrients, just ensure they’re disease-free and haven’t gone to seed. Composted manure, whether from chickens, horses, or cows, delivers concentrated nitrogen and beneficial microbes. Aged manure is safer than fresh, which can burn plants if you’re planning immediate planting. These green materials typically make up about one-third of your total bed volume, creating the heat and biological activity that transforms your layers into rich growing soil.
Essential Tools
You don’t need specialized gardening tools to build a lasagna bed. A garden hose or watering can handles moistening each layer thoroughly. A wheelbarrow or sturdy tarp makes hauling materials easier, though you can work directly from piles if they’re nearby. Durable gloves protect your hands from rough cardboard edges and splinters. If you want defined borders, optional edging like landscape timbers or stone keeps layers contained and gives your bed a finished look, but it’s purely aesthetic.
Before You Start: Important Safety and Site Considerations
Before you dig in, or rather, before you don’t dig in, take a moment to set yourself up for success. A few simple safety checks and smart site choices now will save you headaches later.
When selecting your site, prioritize a spot that gets at least six hours of direct sunlight daily for vegetables, or adjust for shade-tolerant plants if your light is limited. Check drainage by observing how water behaves after a rain; avoid low spots where water pools, as lasagna beds need moisture but not standing water. Make sure you can easily access the bed from all sides for planting and harvesting, a width of three to four feet lets you reach the center without stepping on your layers.
Timing matters, too. Fall is ideal because layers decompose over winter, giving you ready-to-plant beds by spring. Starting in early spring works if you’re willing to wait several months or plan to plant directly into a thick top layer of compost. In warmer climates, you can build lasagna beds nearly year-round, but avoid mid-summer starts when heat accelerates decomposition unevenly and makes keeping layers moist more challenging. If you’re building over existing lawn, there’s no need to remove the grass, it becomes part of your green layer, but do mow it short first for better contact with your cardboard base.
How to Build Your Lasagna Garden: Step-by-Step Process
Step 1: Prepare Your Site
Mark out your bed’s footprint with string, a garden hose, or spray paint. For beginners, start with 3×6 feet, it’s manageable and holds enough material to decompose well. Wider beds (up to 4 feet) let you reach the center without stepping on layers, while longer dimensions just mean more lasagna to build.
If you’re covering lawn, mow the grass as short as possible but leave it in place. Those clippings become your first nitrogen layer and the roots will die back under the cardboard, adding organic matter. Don’t waste time digging or removing sod.
Water the marked area lightly until the soil feels damp. This kick-starts decomposition from below and helps your first cardboard layer stick down flat instead of blowing away. You want moist, not muddy, just enough to activate soil microbes.
Position beds where they’ll get six-plus hours of sun for vegetables, or adapt to shadier spots for greens and herbs. Check that water doesn’t pool after rain; lasagna beds need drainage even though they hold moisture well. If you’re near existing garden areas, consider how you’ll protect plants from foot traffic while you build and harvest.
Step 2: Lay the Foundation Layer
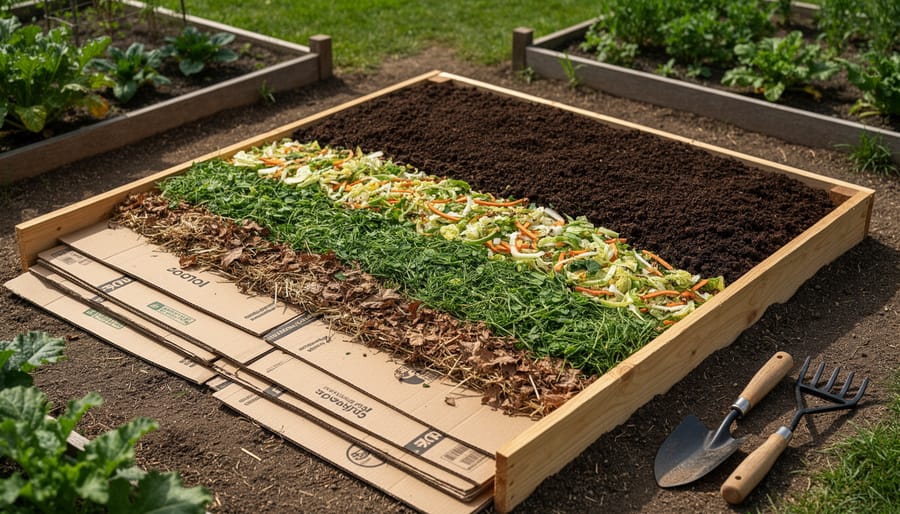
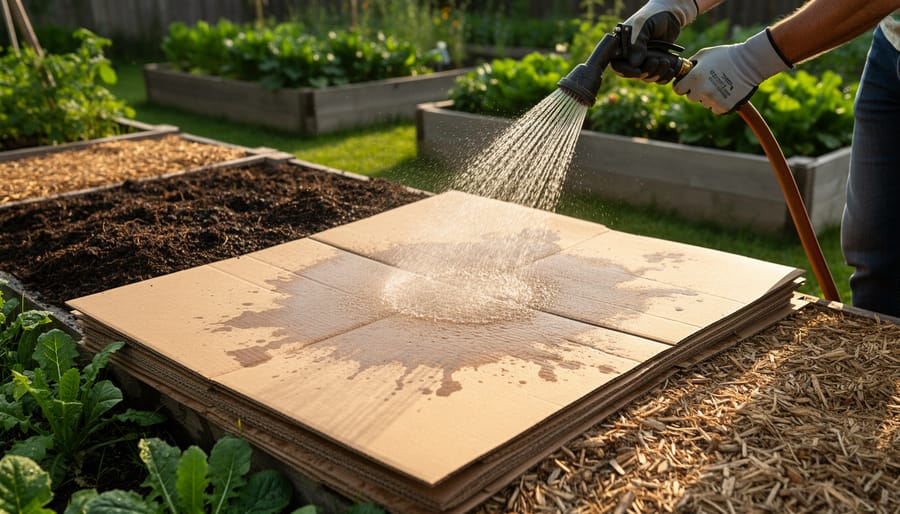
Your foundation layer creates an impermeable barrier that smothers existing grass and weeds while eventually breaking down to feed your new garden. Start by covering your entire prepared site with overlapping sheets of plain corrugated cardboard or 6-10 layers of newspaper. Remove any tape or glossy labels from the cardboard first.
The key is leaving no gaps where weeds can sneak through. Overlap each piece by at least 4 inches at the edges, especially around the perimeter. For newspaper, use a thick stack because single sheets tear too easily when wet. Once your barrier is in place, soak it thoroughly with a hose or watering can until water pools on top, then let it absorb. This cardboard sheet mulching technique works because saturated paper conforms tightly to the ground, blocking light completely while staying permeable enough for water and air to pass through as it decomposes.
If the cardboard starts lifting at the corners, weight it down temporarily with a shovel of compost. You want every inch sealed before moving to the next layer.
Step 3: Alternate Brown and Green Layers
Now comes the heart of lasagna gardening: building your nutrient-rich layers. Think of this like making an actual lasagna, you’re alternating ingredients to create something greater than the sum of its parts.
Start with a brown layer. Spread 2-4 inches of carbon-rich materials like shredded leaves, straw, or newspaper evenly across your foundation. Don’t pack it down; keep it loose so air and water can move through. Water this layer until it’s damp but not soggy, you want the consistency of a wrung-out sponge.
Next, add your green layer. Spread 2-3 inches of nitrogen-rich materials such as grass clippings, kitchen scraps, or fresh plant trimmings. Again, water thoroughly. These materials kickstart decomposition and feed the microorganisms that’ll transform your pile into rich soil.
Here’s the crucial part: maintain a 2:1 or 3:1 ratio of brown to green materials. Too much green creates a smelly, slimy mess. Too much brown slows decomposition to a crawl. If you’re eyeballing it, your brown layers should be slightly thicker than your green ones.
Keep repeating this pattern, brown, water, green, water, until your bed reaches 18-24 inches tall. Most gardeners create four to six complete brown-green cycles. Yes, it’ll look absurdly high at first. That’s normal. The pile will settle to roughly half its original height as decomposition progresses, leaving you with the perfect planting depth.
Step 4: Top It Off and Seal It In
Now that you’ve built up your alternating layers, it’s time to cap everything with a finishing layer that serves two purposes: it gives you a planting surface and helps lock moisture into the bed below.
Spread 3 to 4 inches of quality compost or finished topsoil across the entire top. This layer should be fine-textured and free of debris, it’s where your plant roots will establish before they work their way down into the decomposing materials. If you’re buying compost, look for well-aged product that smells earthy, not sour or ammonia-like.
Water the entire bed one more time, slowly and thoroughly. You want the moisture to soak down through all the layers you’ve built, helping them settle and begin the decomposition process. The bed will compact noticeably over the next few weeks, which is completely normal.
If you plan to plant right away rather than waiting several months, add a 2-inch layer of straw or shredded leaves on top of the compost. This mulch protects the surface, prevents the compost from drying out or crusting, and gives you a ready-to-plant bed within days.
Step 5: Let It Cook or Plant Right Away
You have two planting options once your lasagna bed is built. For full decomposition, let the bed “cook” for 4-6 months. During this time, layers break down completely into rich, crumbly soil perfect for any plant. The bed will settle by roughly half its original height as materials compress and decompose. Water occasionally if rain is scarce to keep decomposition active.
Can’t wait? Plant immediately in the top compost layer. This works well for transplants and larger seedlings with established roots. Push aside the compost and nestle roots into the upper layers. The bed continues decomposing beneath your plants, feeding them as it breaks down. Expect some settling around plant bases, just add more compost to level things out. Direct seeding works best after a month or two when the top layer has stabilized.
How to Know Your Lasagna Garden Is Ready
Your lasagna garden transforms from distinct layers into a unified growing medium through decomposition. If you built your bed in fall, it’s typically ready by spring. For immediate planting beds, you can verify readiness by checking how well the layers have broken down rather than waiting for complete decomposition.
Start with a visual inspection. Push aside the top compost layer and look at what’s beneath. Cardboard should be soft and partially disintegrated, not crisp. Newspaper layers should be breaking apart. Brown materials like leaves and straw will be darker and compressed. You shouldn’t see clearly defined layers anymore, instead, they’ll blend together with fuzzy boundaries.
Next, check the temperature. Active decomposition generates heat. Insert your hand or a compost thermometer several inches deep. A warm bed (80-120°F) is still cooking, which is fine for heat-loving transplants but may stress seeds. A cooler bed closer to ambient temperature indicates decomposition has slowed and the bed is stabilizing.
Look for signs of life. Healthy lasagna beds teem with earthworms, pill bugs, and other decomposers. These creatures indicate your layers are breaking down properly and creating fertile soil. Pull back layers gently, if you see dozens of worms, you’re on track.
If decomposition seems slow, don’t panic. Turn problem areas with a garden fork to add air, which speeds up microbial activity. Add water if materials are dry, or layer in more browns if the bed is soggy. Most beds settle to about half their original height, this is normal, not a problem.
What to Plant and When: Next Steps for Success
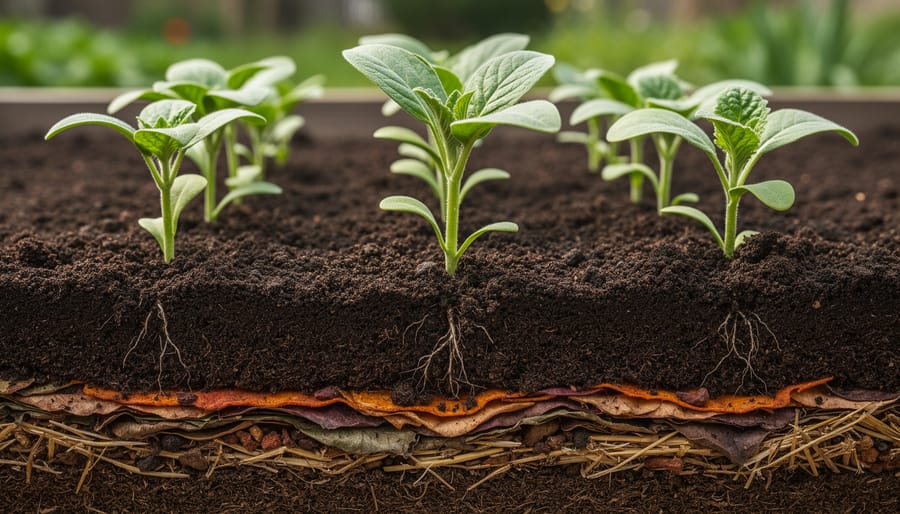
Your lasagna bed offers an ideal environment for a wide range of plants, especially heavy feeders that love the nutrient-rich layers you’ve created. If you’ve built your bed in spring and let it decompose for a season, you can plant anything come fall. For beds where you’ve planted immediately into the top layer, stick with transplants rather than direct-seeding for the first season.
Lasagna beds particularly excel with:
- Tomatoes, peppers, and eggplants that thrive in the warm, fertile soil and benefit from consistent moisture retention
- Squash, zucchini, and cucumbers that spread their roots through the decomposing layers and produce abundantly
- Leafy greens like lettuce, kale, and chard that appreciate the steady nutrient release and cooler root zone
- Root vegetables such as carrots and beets once the layers have broken down enough to allow proper formation
These crops flourish because your layered bed provides sustained nutrition without synthetic fertilizers. A beginner herb garden also works beautifully in lasagna beds, particularly perennial herbs like oregano, thyme, and sage.
When planting into fresh beds, dig pockets down through the top compost layer into the layers beneath, add a handful of finished compost, then set in your transplants. This gives roots immediate access to stable soil while they adjust.
Ongoing maintenance requires minimal effort. Water deeply but less frequently than traditional beds since the layers retain moisture exceptionally well. Top-dress annually each fall with 2-3 inches of fresh compost or a new thin layer of browns and greens to replenish nutrients and maintain bed height as materials continue decomposing. You’ll notice your bed settling several inches in the first year, which is normal. Keep adding organic matter on top and you’re essentially rebuilding the lasagna indefinitely.
Real Gardener Success: Lasagna Garden Stories
Maria, a teacher in Brooklyn, transformed her cramped 4×6-foot concrete patio into a productive lasagna garden in fall 2025. She layered free cardboard from a local bike shop with shredded newspaper, coffee grounds from her morning routine, and fallen leaves collected from neighborhood trees. “I was skeptical that anything would grow in what looked like a messy pile,” she admits. By spring, her layers had compressed to rich, dark soil where tomatoes, basil, and lettuce thrived. The biggest challenge? Convincing her landlord that the temporary “compost heap” look would pay off. It did, she harvested fresh salads for three months and inspired two neighbors to try the method, one adapting it for container gardening on their fire escape.
Meanwhile, James built three 4×10-foot lasagna beds in his suburban Michigan backyard last spring. He used grass clippings from weekly mowing, shredded autumn leaves he’d stockpiled, and aged horse manure from a nearby stable. His challenge was impatience, he planted immediately into the top compost layer rather than waiting for full decomposition. “The first month was slow, but once the roots reached those composting layers, everything exploded,” he reports. His zucchini and pepper yields doubled compared to his old tilled beds, and he’s converted his entire vegetable garden to the no-dig method.
Common Questions About Lasagna Gardening
Can I build a lasagna garden in any season?
You can start lasagna beds any time the ground isn’t frozen, though fall is ideal because you’ll have abundant leaves and the bed can decompose over winter. Spring construction works well if you use finished compost as your top layer for immediate planting.
How much does lasagna gardening actually cost?
Many gardeners spend nothing by using cardboard boxes, fallen leaves, grass clippings, and kitchen scraps. Even if you purchase straw bales and bagged compost for the top layer, a 4×8-foot bed typically costs $20-40, far less than buying topsoil or building raised beds.
Will my lasagna bed attract rodents or other pests?
As long as you avoid meat, dairy, and oils in your green layers, pest attraction is minimal. The decomposing materials do attract beneficial earthworms and soil organisms, which is exactly what you want.
How long until I can plant in my new bed?
If you top your bed with 3-4 inches of finished compost or quality topsoil, you can plant immediately. For beds without a planting layer, wait 4-6 months for the materials to break down enough to support roots.
Can I use the lasagna method in containers?
Yes, the layering principle works in large containers or fabric grow bags, though you’ll use thinner layers and may need to add more finished compost. This approach suits balcony gardens and patios where you want to start this week without ground-level space.
These questions come up repeatedly in gardening communities because lasagna gardening sounds almost too simple to work. The method’s flexibility surprises most beginners: you can adapt it to nearly any situation, from tiny urban spaces to sprawling suburban yards, and you’re not locked into a single approach. If you already have a struggling garden bed with compacted soil, building lasagna layers directly on top revives it without the backbreaking work of double-digging. The beds typically last for years, gradually settling as organic matter breaks down, which is your signal to add fresh layers on top and continue the cycle.
Lasagna gardening proves that creating thriving garden beds doesn’t require back-breaking labor or expensive inputs. You’ve learned a method that transforms everyday organic materials into rich, productive soil while reducing waste and supporting beneficial organisms. That’s sustainable gardening at its most practical.
Start with a single small bed this season. A 4×4 foot area is enough to test the process and see results. You’ll build confidence as you watch those layers settle and transform, and you can always expand next year. Remember, you’re not just planting vegetables or flowers, you’re investing in soil health that compounds over time. Each layer you add feeds next season’s growth.
The beauty of this method lies in its flexibility. Adapt it to your available materials, your climate, and your schedule. There’s no single “right” way, only what works for your garden.
We’d love to hear how your lasagna garden develops. Share your layer combinations, planting choices, and lessons learned with fellow gardeners. Your experience helps others take that first step toward healthier, more sustainable growing spaces.